If you are using the Meraki MR series of Wifi Access points, here are some tips that might make the setup easier:
Check and Set Firmware
- To ensure your access point performs optimally immediately following installation, it is recommended that you facilitate a firmware upgrade prior to mounting your AP.
- Attach your AP to power and a wired Internet connection. See the “Getting Power to the AP” section for details.
- The AP will turn on and the LED will glow solid orange. If the unit does not require a firmware upgrade, the LED will turn either green (no clients associated) or blue (clients associated) within thirty seconds.
* If the unit requires an upgrade, the LED will begin blinking orange until the upgrade is complete, at which point the LED will turn solid green or blue. You should allow at least a few minutes for the firmware upgrade to complete, depending on the speed of your internet connection.
Client Isolation
- NAT mode with Meraki DHCP isolates clients. Devices with a Meraki DHCP address will be able to access external and internal resources, such as the Internet and LAN (if firewall rules permit). However, connected clients will be unable to contact each other. The client isolation features of Meraki DHCP can be seen in the above figure. Client A and Client B can both access the Internet. When Client A wants to send traffic to Client B, the traffic will reach the AP. However, the AP will not forward this traffic to Client B. Therefore, the two clients are isolated from each other.
- Since the client isolation function of NAT mode prevents wireless devices on the SSID from communicating with other wireless devices, NAT mode is not recommended for use with wireless peer-to-peer devices like a wireless printer or Google Chromecast.
- Due to the implementation of client isolation, clients on a NAT mode SSID cannot talk to clients on a bridge-mode SSID when both clients are connected to the same AP.
Factory Reset Button
- If the button is pressed and held for at least five seconds and then released, the AP will reboot and be restored to its original factory settings by deleting all configuration information stored on the unit.
- Hold the reset button in for at least 10 seconds. The LED will turn green and blink twice very two seconds. Release the reset button and the AP should reboot.
LED Indicators and Run Dark Mode
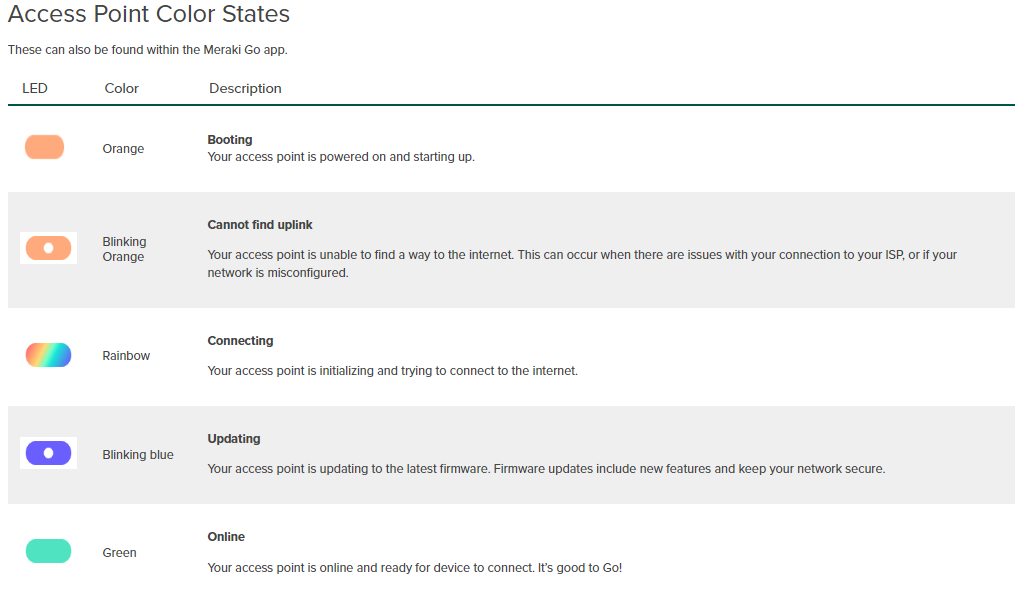
Your access point is equipped with a multi-color LED light on the front of the unit to convey information about system functionality and performance:
- Orange – AP is booting (permanent Orange suggests hardware issue)
- Rainbow – AP is initializing/scanning
- Blinking Blue – AP is upgrading
- Green – AP in Gateway mode with no clients
- Blue – AP in Gateway mode with clients
- Blinking Orange – AP can’t find uplink
NOTE: Blinking Green LED indicates that the device is in site survey mode. Please see the Conducting Site Surveys with MR Access Points for more details.
The MR36 access point may be operated in the “Run Dark” mode for additional security and to reduce the visibility of the access point. In this mode, the LED will not be illuminated. This mode may be enabled through the Meraki Dashboard.

Boot Process
- Power on – LED solid orange for 45 seconds
- LED flashing red-green-blue for 60 seconds
- LED turns solid green for 75 seconds
- SSID starts being broadcast (total of 3 minutes after initial power on)
Installing a Repeater
- Install the mesh repeater within wireless range of the mesh gateway.
- Connect the mesh repeater to its power supply. The power supply can be a Meraki PoE injector, plug-in AC power adapter, or IEEE 802.3af compliant PoE switch. If using Meraki PoE injectors/adapters refer to the instructions in the AP product setup guide. If the LED’s do not light up when the power supply is connected try the following:
a. Swap power supplies with known working supply.
b. When using PoE adpaters or switches try swapping cables, PoE adapters or switches.
c. Make sure the cables are less than 100 meters long
Note: If the repeater is being powered via PoE and/or has any sort of link back to a network, if it is configured with a static IP, it will not come online as a repeater and continue attempting to function as a gateway. - Once the repeater is powered the LED’s go through a series of sequences. Please refer to the Product Setup Guide for the model AP to determine the exact LED locations for your model.
a. Pre-2014 Models
– Radio light will turn solid green or solid orange (MR Units). If the radio light is off make sure power supply is working.
– Signal lights will move back and forth as the AP search for neighbors. The repeaters lights will turn solid green after 2 minutes of scanning if a working route to the mesh gateway can be found. If the lights continuously move back and forth and never turn solid green, the repeater cannot find a route to the mesh gateway.
b. 2014 and beyond Models (single LED)
– The LED will begin as orange while booting, then cycle through all colors while initializing and scanning for a gateway.
– After locating a working gateway, the LED will turn green. If the LED continually blinks orange, it is unable to locate a gateway.
c. If the AP cannot find a working gateway:
– Verify the gateway has been added to the Dashboard network.
– Verify the gateway is online with Dashboard.
– Verify the gateway or another mesh repeater that has a route to the gateway and is within range of the mesh repeater. This can be done by moving them closer together with a line of sight and away from physical obstructions. - After the repeater has established a route to the gateway, the repeater will connect to the cloud and begin downloading its firmware and configuration. During this time the Radio light will begin flashing green or orange (MR units). Once the firmware is upgraded the AP will reboot and go through the same light sequences.
- Once the AP has booted up and confirmed that it has the latest firmware the radio and signal lights will turn solid green.
- If a Gateway loses its connectivity to the network, it will shift to the Repeater mode in about one minute. Then the LED will start flashing green-blue-red while it tries to find a Gateway. Once it finds a Gateway, the LED will turn green. Once a client connects to the repeater, the LED will turn blue. The Repeater sync time can be 3 to 10 minutes, depending upon the strength of the Repeater channel signal from the Gateway.
Firewall Rules
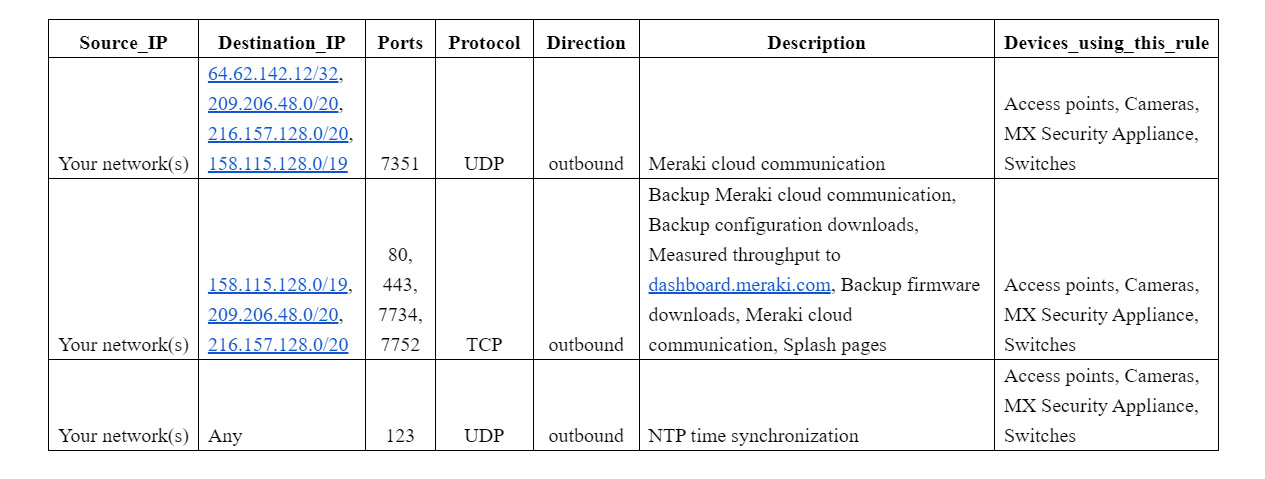
This list is intended to help guide you in creating firewall rules for the Cisco Meraki cloud.

